Every session, you explain what “good code” means. Semantic HTML. Accessibility requirements. Your project’s component patterns. The testing approach you’ve settled on after three rewrites.
Then compaction happens. Or you close the session. Tomorrow you start over.
A prompt is a one-time instruction. A plugin packages expertise into something that persists — commands you can invoke, skills that load on demand, hooks that run automatically.
This post covers the practical side: where to find plugins, how to enable them, what the ecosystem looks like. If you want the full philosophy of building skills from scratch, I wrote a four-part series on that. Here we focus on getting value from what already exists.
The Plugin Ecosystem
Claude Code plugins live in a few places.
The official marketplace: claude-plugins-official is available by default. It includes plugins maintained by Anthropic:
- Code intelligence: LSP plugins for Python, TypeScript, Rust, Go, and other languages
- Development workflows:
commit-commands,feature-dev,plugin-dev - Integrations: GitHub, Playwright, Sentry, and others
- Style guides:
frontend-design,explanatory-output-style
Run /plugin list to see what’s available. These are curated and reasonably safe.
Community marketplaces: Anyone can create a marketplace and share plugins. You add them with:
/plugin marketplace add {github-url}Quality varies. Some community plugins encode genuine expertise. Others are system prompts in a trench coat — they tell the agent to “be an expert” without teaching it what to do.
Evaluating Plugin Quality
A few signals that a plugin is worth trying:
- Procedures, not personas: Does it tell the agent what to do, or just what to be? “You are a TDD expert” is useless. “Run tests before implementing, verify failures before fixes” is actionable.
- Gates and verification: Good plugins include checkpoints. “Before committing, run quality gates” beats “write clean code.”
- Clear boundaries: The plugin says what it covers AND what it doesn’t.
When evaluating a plugin, check its commands and skills. If they read like fortune cookies, skip it. If they read like procedures with specific steps, try it.
Automated evaluation: Anthropic’s plugin-dev plugin includes skills for auditing plugins against best practices. Clone the plugin repository, then ask Claude to evaluate it using those skills. Fair warning: most community plugins fail this check. People are remarkably negligent about following the specification.
Security note: Anthropic does not audit third-party plugins or MCP servers. You bear the risk for anything outside the official marketplace.
Plugins vs Commands vs Skills
These terms get confused. Here’s how they relate.
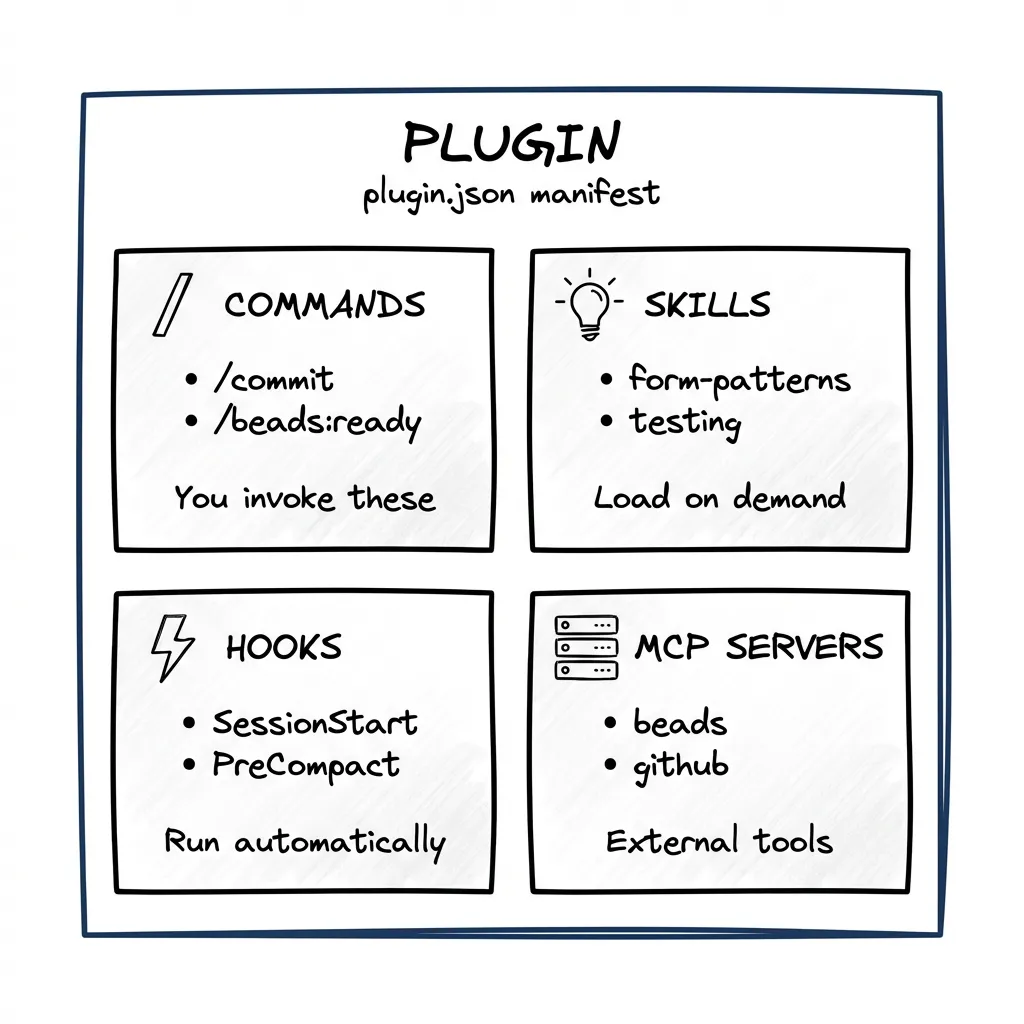
Commands are actions you invoke explicitly. Type /commit or /beads:ready and something happens. Commands live in a plugin’s commands/ directory as markdown files.
Skills are units of expertise that load on demand. When Claude recognizes it’s working on UI, the frontend-design skill loads automatically. Skills live in a plugin’s skills/ directory.
Plugins bundle everything. A plugin contains commands, skills, hooks, and sometimes MCP server definitions. (MCP servers are covered in Part 2.) When you install a plugin, all its components become available.
Hooks run automatically on events. A plugin can define hooks for session start, pre-compaction, before tool use, and other events.
Think of it this way:
- Command = button you press
- Skill = expertise that loads when relevant
- Hook = automation that runs on triggers
- Plugin = the package containing all of the above
Example: The Beads Plugin
Beads is a task tracking system I covered in the first post. The beads plugin packages everything needed for the workflow.
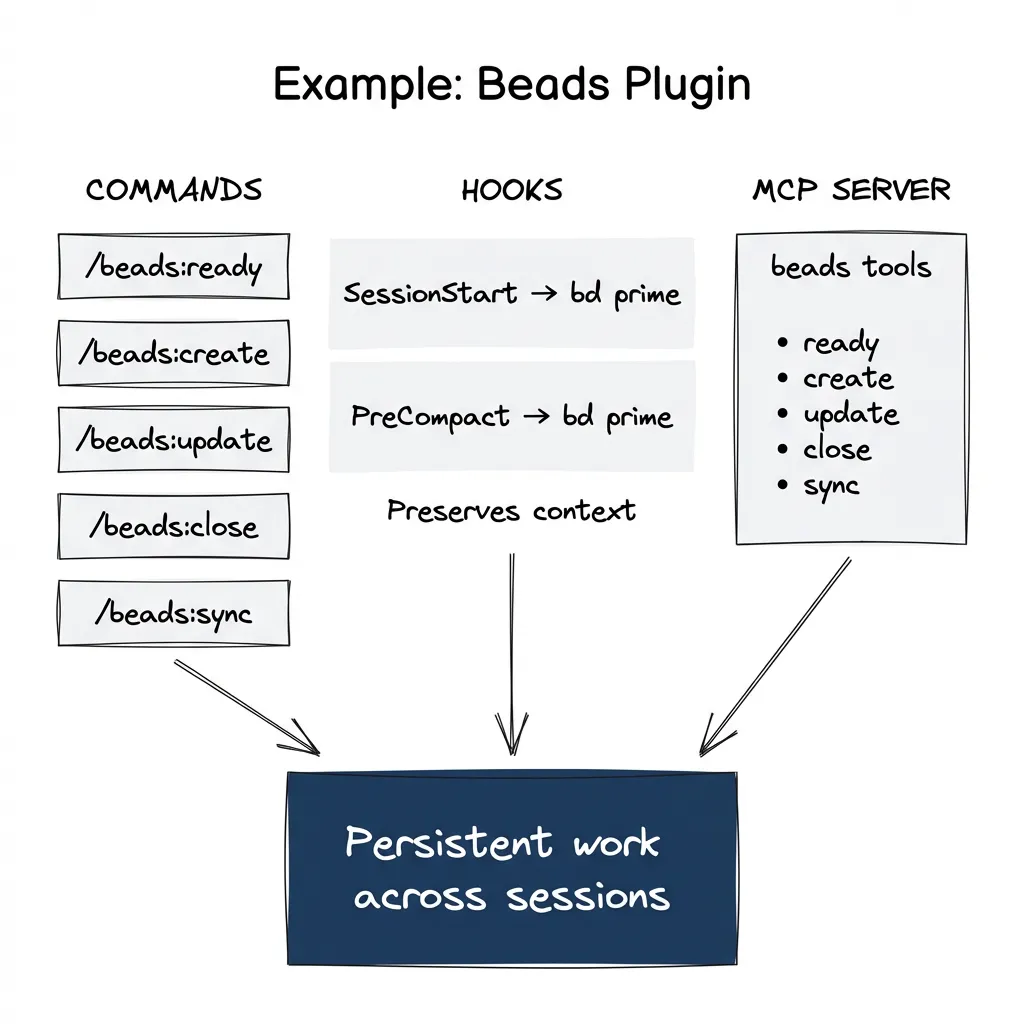
Plugin manifest (plugin.json):
{
  "name": "beads",
  "description": "AI-supervised issue tracker for coding workflows",
  "version": "0.48.0",
  "author": { "name": "Steve Yegge" },
  "hooks": {
    "SessionStart": [{ "type": "command", "command": "bd prime" }],
    "PreCompact": [{ "type": "command", "command": "bd prime" }]
  }
}
Commands it provides:
/beads:ready— Find tasks with no blockers/beads:create— Create a new task/beads:update— Update task status/beads:close— Mark task complete/beads:sync— Sync with git
Hooks it runs:
- On session start: runs
bd primeto load context - Before compaction: runs
bd primeto preserve state
What this means in practice: The beads plugin gives you the foundation — commands to manage tasks, hooks to preserve context across sessions. But it’s a framework, not a complete workflow. You still need to define what counts as a bug vs a task, what makes requirements acceptable, when to close work. The plugin handles the mechanics. Your rules and CLAUDE.md define the process.
Installing and Managing Plugins
Installation
From the official marketplace:
/plugin install frontend-design@claude-plugins-officialFrom a custom marketplace:
/plugin marketplace add https://github.com/steveyegge/beads
/plugin install beads@beads-marketplace
The format is always plugin-name@marketplace-name.
Enable and Disable
Check your enabled plugins:
/plugin listDisable a plugin you don’t need:
/plugin disable {name}Enable it again:
/plugin enable {name}Scopes
Plugins can be installed at project, user, or global level — same as other Claude Code settings.
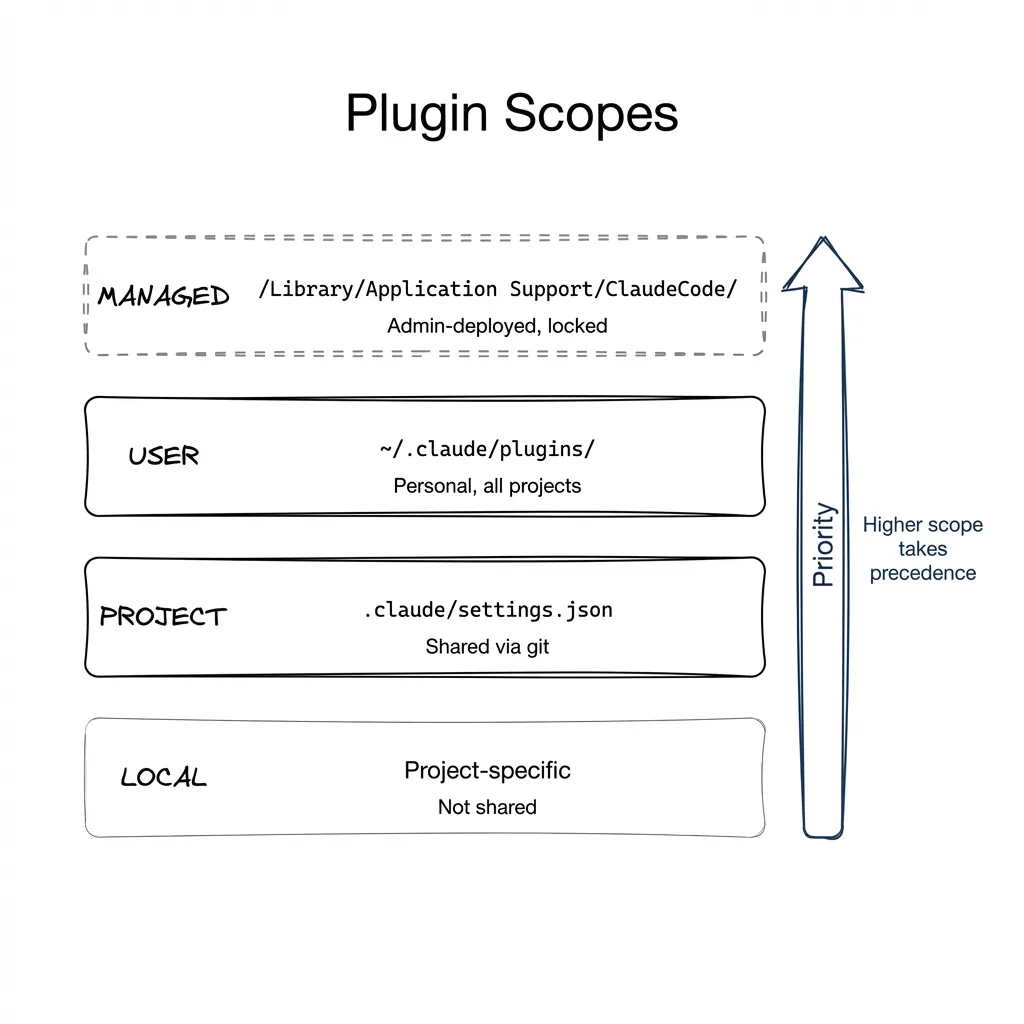
| Scope | Location | Shared? |
|---|---|---|
| User | ~/.claude/plugins/ | Personal, all projects |
| Project | .claude/settings.json | Yes, via git |
Most plugins install at user scope. Project scope makes sense when your whole team should use a plugin.
From Project Skills to Reusable Plugins
Most developers don’t need to write plugins from scratch. The ecosystem covers common patterns. Start by using what exists.
But sometimes your project has specific patterns worth encoding. The path I recommend:
Step 1: Start with project skills
Create skills directly in your project’s .claude/skills/ directory. This works immediately — no installation needed.
The easiest approach: use Anthropic’s plugin-dev plugin and its skill creation skill. Record yourself explaining what the skill should do — the patterns, the gates, when it applies. Transcribe that recording and pass it to Claude along with your instructions. The skill creation skill handles the structure and formatting.
your-project/
└── .claude/
    └── skills/
        └── form-patterns/
            └── SKILL.md
Step 2: Extract to a plugin when patterns mature
Once you have skills that prove useful across projects, extract them to a separate repository with the full plugin structure:
my-plugin-repo/
├── .claude-plugin/
│   └── plugin.json       # Manifest
├── commands/
│   └── my-workflow.md    # Slash commands
├── skills/
│   └── my-patterns/
│       └── SKILL.md      # Skills
└── agents/
    └── my-agent.md       # Agent definitions
Step 3: Publish and install
Push the repository to GitHub. Add it as a marketplace and install:
/plugin marketplace add https://github.com/your-org/your-plugin
/plugin install your-plugin@your-marketplace
This is how agentic-toolkit evolved — project skills that proved useful became a shared plugin across our team.
Why not start with a plugin? Creating a plugin directly in .claude/ doesn’t work automatically. You’d need to launch Claude with --plugin-dir or go through the full publish-and-install flow. For iteration, project skills are simpler.
For the full methodology — mining patterns from real usage, stress testing, quality audits — see The Agent Skills series.
Getting Started
This week:
-
Check what’s active: Run
/plugin list. You might have more enabled than you realized. -
Try an official plugin: If you haven’t used
frontend-designorplaywright, enable them and see how they change the agent’s behavior. -
Install beads: If you’re not using it yet, beads solves the session persistence problem. The plugin integrates it with Claude Code.
Next week:
-
Identify your repeating explanations: What do you type every session? That’s a candidate for a skill.
-
Create one project skill: Just one. Put it in
.claude/skills/in your project. Follow the minimal structure above. See if it saves time and makes agent’s path to solution more like a straight line.
Blueprint repository: github.com/postindustria-tech/agentic-development-demo — shows plugin organization and skill structure in practice.
The Payoff
Without plugins: “Implement a contact form with validation. Use Zod for the schema, react-hook-form for state management. Make sure you have aria-invalid on error fields. Show loading state during submission. Run tests before committing. Use our design system components, not raw HTML inputs. And remember to sync beads when you’re done.”
With plugins: “Create a contact form.”
The form skill has the validation approach. The frontend-design plugin has the accessibility requirements. The beads plugin handles persistence. Your CLAUDE.md ties them together — referencing which skills apply where. You stop re-explaining. The agent executes from the playbook.
Context gives your agent knowledge. Verification catches mistakes. Plugins give your agent judgment — without you repeating yourself.
Third in a series on agentic development. Previously: Stop Using Claude Code Like a Copilot and Claude Code MCP Setup. For the full skill-building methodology, see The Agent Skills series. Next: verification patterns with Playwright and quality gates.